Einleitung
In dieser Anleitung zeigen wir dir, wie du das defekte Display deines iPhone 7 Plus reparieren kannst. Dieses Ersatzteil ist schon mit der Fronteinheit, dem Ohrhörer-Lautsprecher und der LCD-Abschirmung ausgestattet, dadurch vereinfacht sich die Reparatur.
Du musst nur noch das alte Display ausbauen und den Home Button auf das Ersatzteil übertragen, damit er weiterhin funktioniert.
.
Werkzeuge
-
-
Schalte das iPhone aus, bevor du es auseinandernimmst.
-
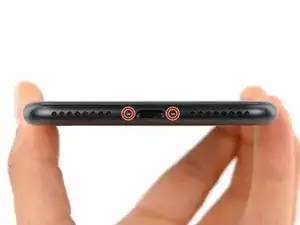
Entferne die zwei 3,4 mm Pentalobe Schrauben an der Unterseite des iPhones.
-
-
-
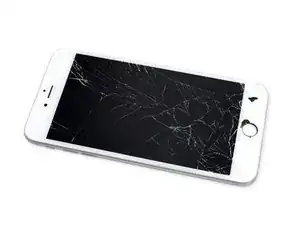
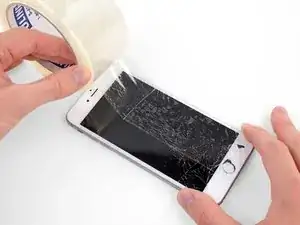
Wenn dein Display zerbrochen ist, dann solltest du ein weiteres Zerbrechen verhindern und Verletzungen während der Reparatur vermeiden, indem du Klebeband auf der Glasscheibe befestigst.
-
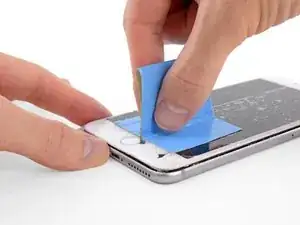
Klebe überlappende Streifen von durchsichtigem Paketband über das Display des iPhones, bis die ganze Frontscheibe bedeckt ist.
-
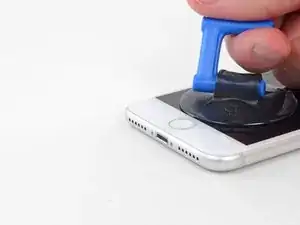
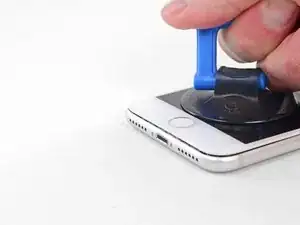
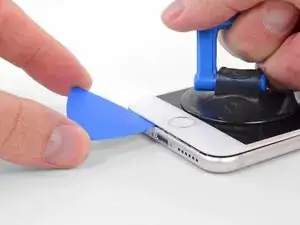
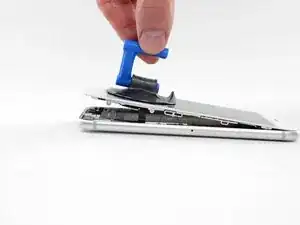
Wenn die Scheibe so stark geplittert ist, dass du den Saugheber während der nächsten Schritte nicht ansetzen kannst, dann kannst du versuchen, ein sehr starkes Stück Klebeband (etwa Panzerband) zu einem Griff zu falten und aufzukleben. Versuche dann das Display damit anzuheben. (so wie im dritten Bild gezeigt)
-
-
-
Überdecke die Glasscheibe des Displays komplett mit überlappenden Streifen von Paketband.
-
Wenn das Glas so stark zerbrochen ist, dass der Saugheber in den nächsten Schritten nicht gut haftet, dann versuche ein starkes Klebeband ("Panzerband") zu einem Griff zu falten und so auf die Scheibe zu kleben, dass du sie damit hochziehen kannst.
-
-
-
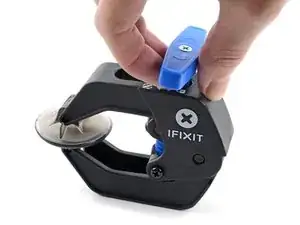
Wir haben die Anti-Clamp entwickelt, um Geräte sicher zu öffnen. Die nächsten drei Schritte zeigen die Benutzung der Anti-Clamp. Wenn du sie nicht verwenden willst, überspringe die nächsten drei Schritte und folge einer anderen Methode.
-
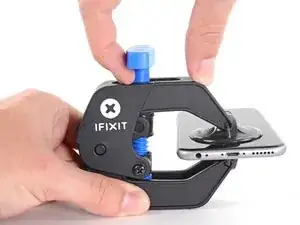
Drücke den blauen Griff zurück, damit die Arme der Anti-Clamp frei beweglich werden.
-
Schiebe die Arme entweder über die linke oder die rechte Kante des iPhones.
-
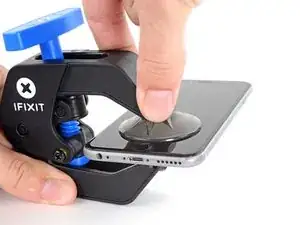
Bringe die Saugheber am unteren Rand des iPhones direkt über dem Home Button an, einen auf der Vorderseite, den anderen auf der Rückseite.
-
Drücke die Saugheber zusammen, so dass sie auf den Oberflächen haften.
-
-
-
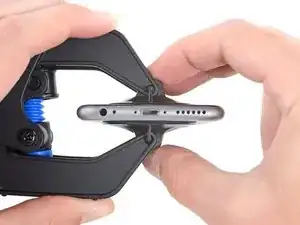
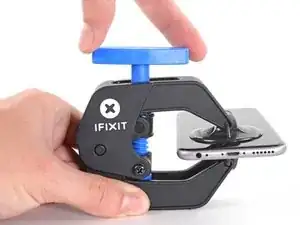
Drücke den blauen Griff vorwärts, damit die Arme wieder fest sind.
-
Drehe den Griff eine volle Umdrehung im Uhrzeigersinn, oder bis du merkst, dass sich die Saugheber dehnen.
-
-
-
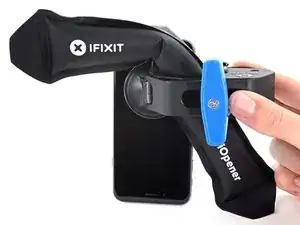
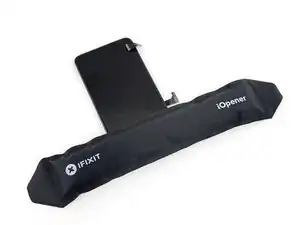
Führe einen erwärmten iOpener durch die Arme der Anti-Clamp.
-
Forme den iOpener so, dass er auf der Unterkante des iPhones liegt.
-
Warte eine Minute, damit sich der Kleber lösen und ein Spalt entstehen kann.
-
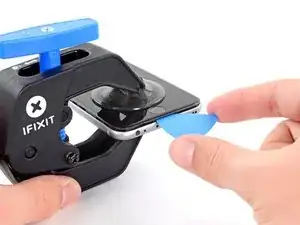
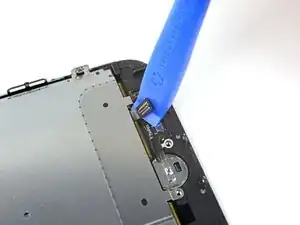
Wenn die Anti Clamp einen ausreichend großen Spalt erzeugt hat, setze ein Plektrum unter das Display ein.
-
Überspringe die nächsten drei Schritte.
-
-
-
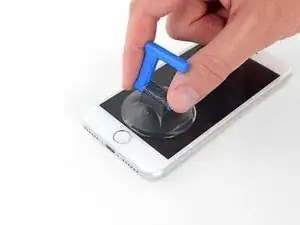
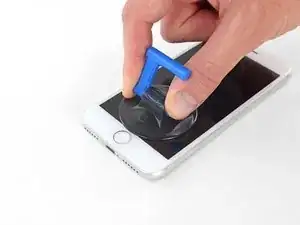
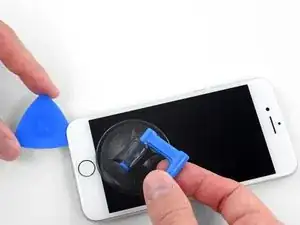
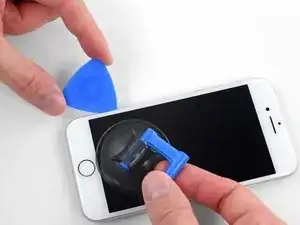
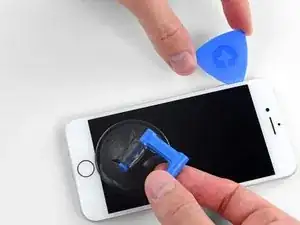
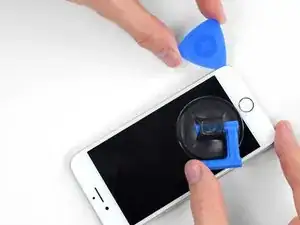
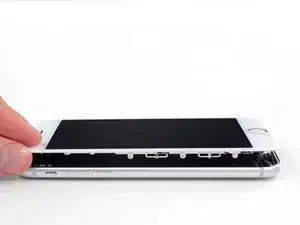
Ziehe gleichmäßig und fest am Saugnapf. Es sollte sich ein kleiner Spalt zwischen Display und Rahmen bilden.
-
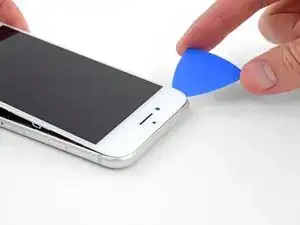
Setze ein Plektrum in den Spalt ein.
-
-
-
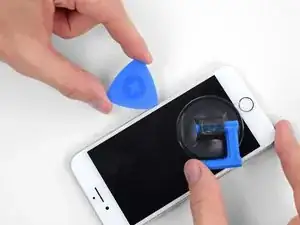
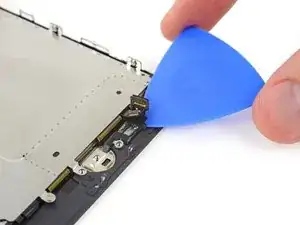
Schiebe das Plektrum entlang der linken Kante von der unteren Ecke an nach oben in Richtung der Tasten für die Lautstärkeregelung und des Stummschalters. Trenne so die Klebeverbindung des Displays auf.
-
Halte vor der oberen linken Ecke an.
-
-
-
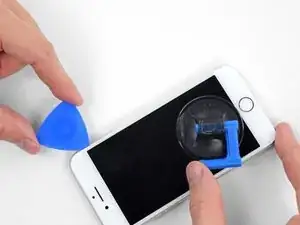
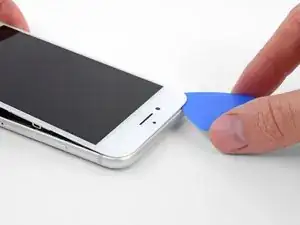
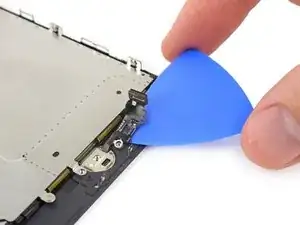
Setze das Plektrum an der rechten unteren Ecke ein. Schiebe es um die Ecke herum, dann entlang der rechten Kante nach oben. Trenne dadurch die Verklebung.
-
-
-
Hebe vorsichtig den Saugnapf an und mit ihm den unteren Teil des Displays.
-
Ziehe an der kleinen Lasche am Saugnapf, um ihn vom Front Panel zu lösen.
-
-
-
Schiebe das Plektrum unter das Display um die obere linke Ecke und die Oberkante entlang, um die letzte Klebeverbindung zu trennen.
-
-
-
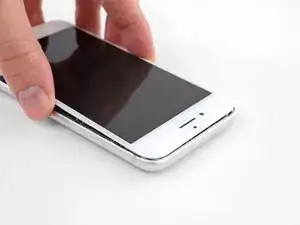
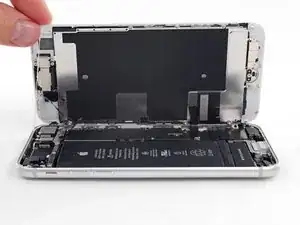
Schiebe die Displayeinheit leicht nach unten, weg von der Oberkante, um die Clips zu lösen, mit denen sie am Rückgehäuse gehalten wird.
-
-
-
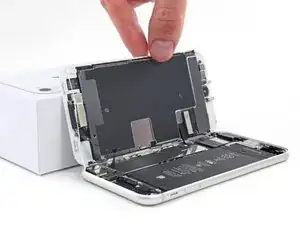
Öffne das iPhone, indem du das Display von der linken Seite her umklappst, so wie wenn du ein Buch öffnest.
-
Lehne das Display an einen geeigneten Gegenstand, um es gut zu stützen, während du weiter am iPhone arbeitest.
-
-
-
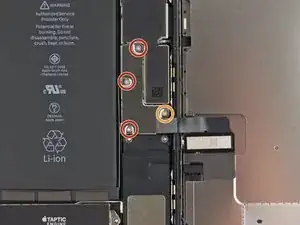
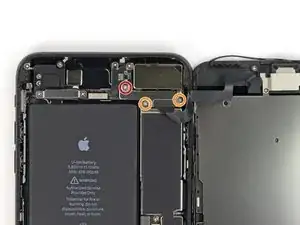
Entferne die folgenden Dreipunkt Y000-Schrauben, die die Blende des unteren Displaykabels am Logic Board fixieren:
-
Drei 1,2mm Schrauben
-
Eine 2,6mm Schraube
-
-
-
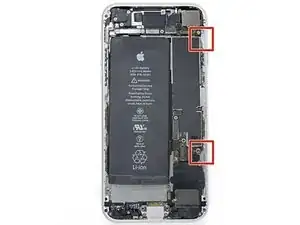
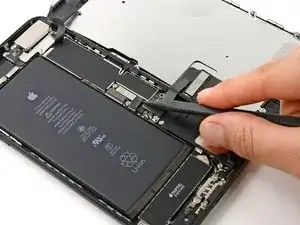
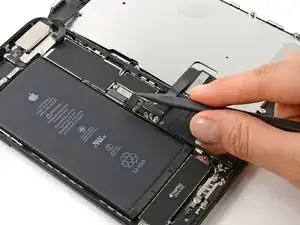
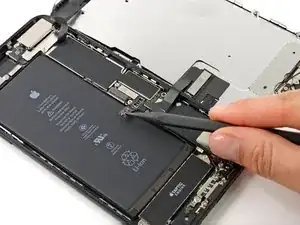
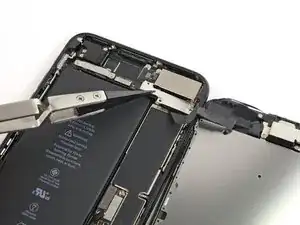
Mit der Spitze eines Spudgers kannst du den Batterieanschluss aus seinem Stecker auf dem Logic Board heben.
-
-
-
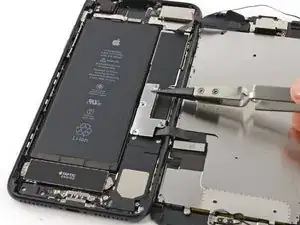
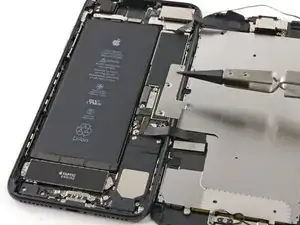
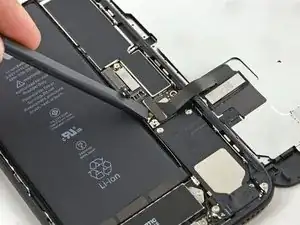
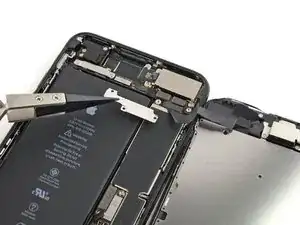
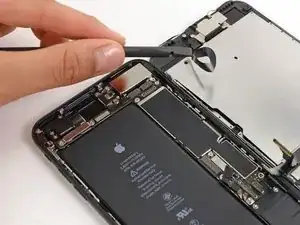
Nutze das flache Ende eines Sprudgers oder einen Fingernagel, um die beiden unteren Displaystecker aus ihren Buchsen auf dem Logic Board zu hebeln.
-
Wenn du nach dem Zusammenbau kein Bild hast, das Display nur weiße Zeilen zeigt oder die Touchfunktion teilweise oder ganz ausgefallen ist, dann löse noch einmal diese beiden Kabel und verbinde sie neu. Achte darauf, dass sie gut sitzen.
-
-
-
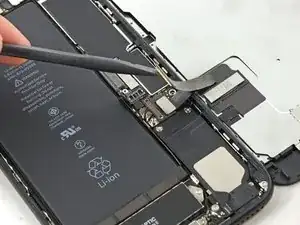
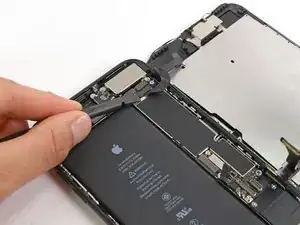
Entferne die drei Dreipunkt Y000 Schrauben, mit denen die Abdeckung über der Buchse für den Sensor des Front Panels befestigt ist.
-
Eine 1,3mm Schraube
-
Zwei 1,0mm Schraube
-
Entferne die Abdeckung.
-
-
-
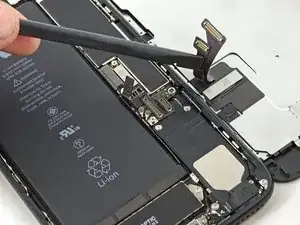
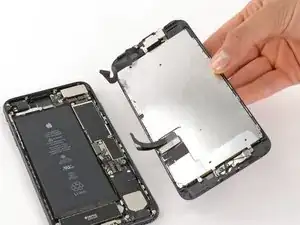
Ziehe den Stecker der Front Panel Sensoreinheit aus der entsprechenden Buchse auf dem Logic Board.
-
-
-
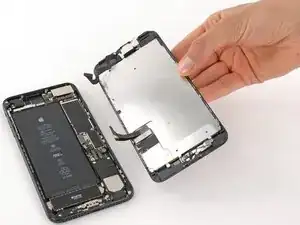
Entferne die Displayeinheit.
-
Unterbrich hier während des Zusammenbaus wenn du den Klebstoff um die Kanten des Displays ersetzen willst.
-
-
-
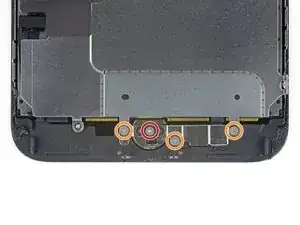
Entferne die vier Y000 Schrauben, mit der die Abdeckung des Home / Touch ID-Sensors befestigt ist:
-
Eine 1,1 mm Schraube
-
Drei 1,3 mm Schraube
-
-
-
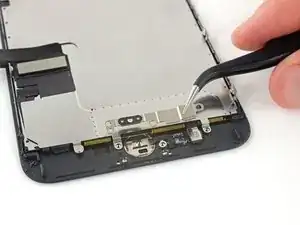
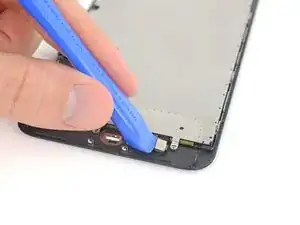
Heble unter der linken Kante des Steckers vom Home Button Kabel und löse ihn aus seinem Anschluss heraus.
-
Wenn der Stecker komplett hochklappt, ohne sich zu lösen dann drücke das Kabel an der Oberkante des Steckers mit dem flachen Ende des Spudgers nach unten und heble gleichzeitig die linke Kante des Steckers hoch. Beschädige nicht das Kabel oder den Stecker, sonst kannst du den Sensor auf Dauer zerstören.
-
-
-
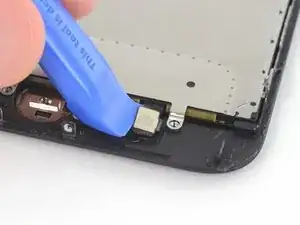
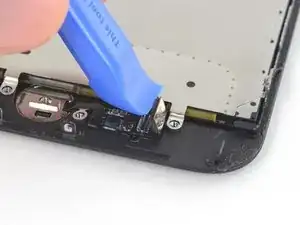
Heble behutsam den darunterliegenden Stecker hoch und biege ihn aus dem Weg für das Home Button/TouchID Kabel.
-
Wenn sich der Stecker nicht leicht hochhebeln lässt, dann erwärme den Kleber des Steckers mit einem Haartrockner oder einem iOpener, versuche es dann nochmals.
-
Versuche nicht, den Stecker ganz abzulösen - klappe ihn einfach ein wenig hoch, so dass das darunterliegende Home Button/TouchID Sensorkabel entfernt werden kann.
-
-
-
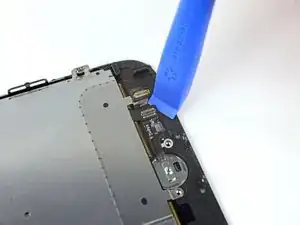
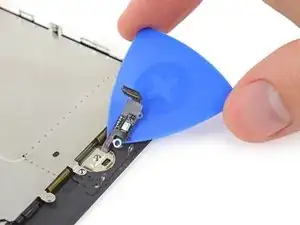
Drehe die Displayeinheit herum. Nimm einen Haartrockner oder bereite einen iOpener vor und erwärme etwa 90 Sekunden lang die Unterkante des Displays, damit der Kleber darunter weich wird.
-
-
-
Schneide vorsichtig mit einem Plektrum durch den Kleber, der das Home / Touch ID Sensorkabel an der Rückseite des Displays hält.
-
-
-
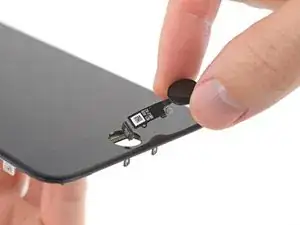
Entferne die Home/Touch ID Sensoreinheit, indem du sie über die Vorderseite des Displays herausnimmst.
-


Vergleiche dein neues Ersatzteil genau mit dem Originalteil. Möglicherweise musst du fehlende Bauteile übertragen oder Schutzfolien abziehen, bevor du es einbauen kannst.
Um dein Gerät wieder zusammenzusetzen, folge den Schritten in umgekehrter Reihenfolge.
Entsorge deinen Elektromüll fachgerecht.
Hat die Reparatur nicht ganz geklappt? Versuche es mit ein paar grundständigen Lösungen, ansonsten findest du in unserem Forum Hilfe bei der Fehlersuche.

59 Kommentare
Only the glass is broken on my screen. I don't need a new digitizer. Is there a way to just replace the glass? Seems like that would be much cheaper. Thanks!
Unfortunately, by the nature of the technology, cracked glass likely means your digitizer is out of commission (does touch still register on the cracked screen?). Below that is the LCD, and that might not be broken (if the image is fine, then the LCD is likely fine). The problem is that these components are VERY VERY difficult to separate. This makes the individual replacements a nightmare. I hate to say anything is impossible, but separating these components will feel impossible without expensive tools and extensive knowledge. It will also likely end in a mess of broken components. When there is a will, there is a way. But the separation project will demand a lot of will.
Our store is having trouble with the earpiece speaker working after screen repair on just the 7 Plus, not with the 7. We have tried different techniques and still get figure what we are doing wrong. Has anyone else had this problem and know the solution?
Joe Cox -
My earpiece speaker also won't work with new screen... this is frustrating. Any solution
Ben -
There are some connections for the earpiece speaker that can be a little tricky to get properly connected during reassembly. If you look at the third photo in step 22 of the iPhone 7 Plus teardown you can see four copper pads on the cable, and four protruding copper connections on the speaker. For starters, make sure that these are all clean. When reassembling, make sure that the metal pads on the cable firmly touch the metal pins on the speaker. These are actually electrical connections, and are a little tougher to seat properly because they don't snap in like press or ZIF connectors. If the metal is all lined up and pressed against each other, then electricity should be flowing and sound should result! If the earpiece speaker was not removed and this guide was followed as is, it is most likely an issue with the connectors in step 19 of this guide.
I am an amateur and have successfully transferred all components to a replacement screen earphone and home button as well as the large metal bracket on the back without a problem. During the process though the flex cable for the ear piece gave me some issue because the flex cable is actually 2 separate pieces that are held together by some adhesive. Underneath it there are some connectors that have to line up perfectly. If you are doing repairs on a hot surface that adhesive will become more likely to separate when you try to relieve it from the broken screen. Keep that in mind. If it does come separated like mine did during replacement simply line the connectors up and give it a squeeze for a few seconds to get the adhesive to take then let it cool down before re installation.
Make sure when you are connecting the earpiece ribbon cable you attach it the correct way. It seems like it should be connected with the excess of the ribbon cable going upwards but that is incorrect and will render the speaker useless. You have to make sure when you connect it the the excess is going downwards. This will make the ribbon cable appear as though it is twisted tangled but that is how it has to be connected. I wish I could upload pictures
why do you need to change the touch ID sensor? if your replacement screen comes with a touch ID, do you still need to swap it?
kjding -
For security reasons, each iPhone's Touch ID sensor is uniquely paired to the logic board at the factory. If you replace your screen without transferring over your original home button, you will lose Touch ID functionality. If your replacement screen came with a replacement home button anyway, take it off and carefully replace it with your original home button.
For the 7, the home button also must detect a fingerprint in order for the home button functionality to work. Because the security feature turns off the TouchID function, the iPhone stops trying to detect a fingerprint and makes the home button not work at all. You want to keep the original home button and be careful not to rip the cable because for this particular generation of iPhone, there is no replacing the home button.
The recommendation of discharging the battery is completely unnecessary. Even a 25% charged battery can explode. Completely ridiculous suggestion.
pargoff -
The risk of thermal runaway on these batteries decreases with the battery's SOC (state of charge). Below 50% charge the risk is fairly low, and at 25% charge the risk of a thermal event is near zero. If I recall correctly, the same suggestion appears in Apple's official (non-public) service manuals for the iPhone.
Jeff Suovanen -
@jeffsu Yes, that is correct. Apple does require all certified staff to discharge the battery below 25%. This is an industry standard for all LiION batteries. If you don’t want to do this, just make sure to not puncture the battery and disconnect it first thing.
Ben Meinhart -
Hang on a second here, doesn’t the Ifixit part I ordered come with the seals? The display assembly? It doesn’t. Now I have to wait another week?!
Vanessa Pinter -
How do you turn off if the screen isn’t responding to touch?
adam -
The replacement battery came with the seal—but how do you put it on???
lkollar -
Instructions for replacing the seal are here: Austausch der iPhone Display Klebestreifen
bester -
I just found the instructions on how to install the seals AFTER I was completed and had to figure it out. Maybe, just maybe you should link this somewhere on the guild instead of buried in a comment. Just a thought.
Charles Meitin -
Step 1 is: Read through all the steps and comments or the method prior to starting on this Step 1. There's a lot of much needed information and experience that you can learn from which will reduce the chance of struggling, wasting time or even breaking your device.
My favourites are:
Use a hot water bottle.
Label all screws you remove with their size and location on a piece of paper with double sided sticky tape.
Test the lightning assembly at step 13
There is a Standoff driver bit in the box, don't use a screwdriver.
etc...
Neil Eriksen -
A tip for looking out for all those little screws. I used an ice block tray, for all the little screws etc. I numbered each with the step number, as in the instructions, but not all steps have bits to look out for. Where two different size screws are used I had a tray for each size and marked step a and step b. For this I coloured each tray sticker with the colour of the screw as shown in the instructions. All this worked a treat with no confusion or using the wrong part.
Herb
Herb Adler -
The screw size for those with a screw set is P2.
Gareth Flandro -