Einleitung
Wenn das Steuerkreuz deines Switch Pro Controller zu empfindlich ist und versehentliche Eingaben erzeugt, dann ist diese Anleitung genau die Richtige für dich!
-
-
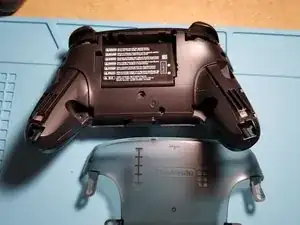
Der linke und rechte Griff sind mit je einer J00 Schraube befestigt. Nachdem die Schrauben entfernt sind, kann man die Griffe nach unten abziehen.
-
-
-
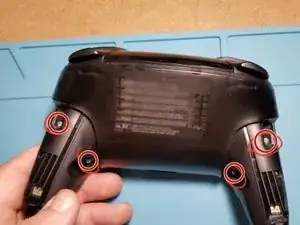
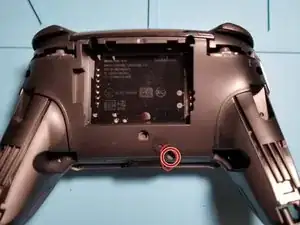
Entferne die vier J00 Schrauben, mit denen die hintere Gehäuseabdeckung befestigt ist.
-
Nachdem die Schrauben entfernt sind, kann kann die Abdeckung ohne oder nur sehr geringem Widerstand entfernt werden.
-
-
-
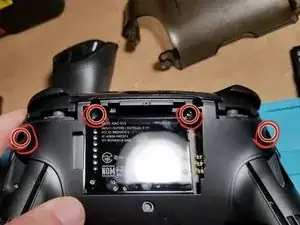
Entferne eine weitere J00 Schraube.
-
Entferne vier weitere J00 Schrauben. Die beiden Schrauben im Akkufach sind leicht zu übersehen!
-
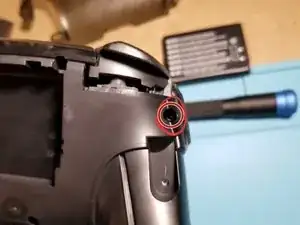
Eine Nahaufnahme der Schrauben am Gehäuserand (Diese können auch leicht übersehen werden!).
-
-
-
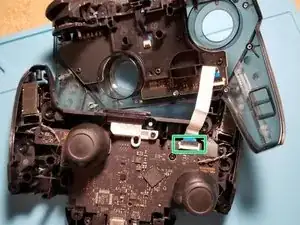
Benutze ein Hebelwerkzeug oder deinen Fingernagel, um die beiden Hälften vorsichtig voneinander zu trennen. Sei vorsichtig mit dem Kabel, das die beiden Platinen verbindet!
-
Es handelt sich hier um einen ZIF-Anschluss. Der schwarze Teil des Anschlusses kann leich nach oben geklappt werden. Anschließend kann das Kabel ohne Kraftaufwand aus dem Anschluss gezogen werden. Ich habe das Kabel an der Platine mit den Sticks entfernt.
-
-
-
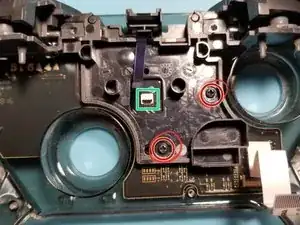
Trenne das Kabel ab, das die Platte mit der Controller-Platine verbindet.
-
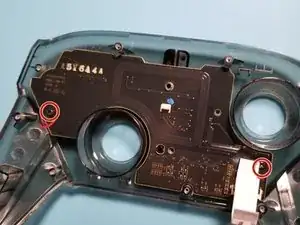
Anschließend können die beiden J00 Schrauben entfernt werden, mit der Platte mit der Platine Verbunden ist.
-
-
-
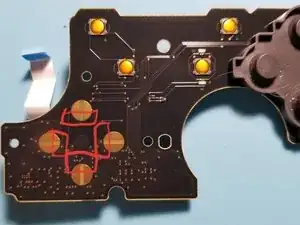
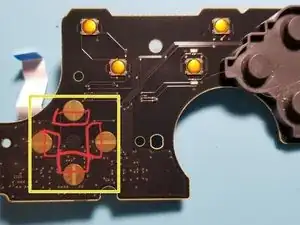
Voila! Hier sind die Kontaktflächen des Steuerkreuzes. Ich habe den Bereich, der abgedeckt werden muss, in rot markiert.
-
Benutze Klebeband (Ich empfehle schwarzes Isolierband, aber andere hatten auch mit Tesafilm oder Paketband Erfolg. Es kann jedoch sein, dass sich dieses mit der Zeit löst und das Steuerkreuz daran kleben bleibt!), um die markierten Bereiche zu bedecken. Das hilft enorm gegen versehentliche Tastendrücke.
-
Nachdem ich etwas experimentiert habe, habe ich das Klebeband auf die oberen und unteren Pads geklebt. Dies hat bei mir zum besten Ergebnis und zu den wenigsten versehentlichen Tastendrücken geführt. Teste aber auf jeden Fall dein Ergebnis (und ob das Tastengefühl stimmt), bevor du den Controller wieder zusammenbaust.
-


Um deinen (teuren) Controller wieder zusammenzubauen, befolge einfache die Schritte der Anleitung in umgekehrter Reihenfolge.
Hoffentlich war die Anleitung einfach und leicht zu befolgen - genauso simpel, wie auch die Lösung ist. Bei meinem Controller ist es ein Unterschied wie Tag und Nacht, was die Empfindlichkeit angeht.
Ich hoffe du hast einen guten Tag und viel Spaß beim Reparieren!
13 Kommentare
Thanks!! I got a bit confused on the 2nd ribbon cable because I wasn’t sure if it was a latch like the first but it worked out. Also reassembling the ribbon cables was a bit difficult and I wasn’t exactly sure how much I had to “plug” them in before closing the latch but I figured it out, thank you! Controller works wonderfully now.
Glad to hear it! Thank you for your comment!
Any issues using kapton tape instead of electrical tape?
Mirleis -
Not to my knowledge (I don’t have any on hand to test with though). May be worth a shot!
It should be noted that the official iFixit kit is recommended for the back screw removal (especially the ones at 11 and 1 o clock by the battery compartment) or you should have a screwdriver that is skinny enough to get it straight on. I barely got it with the iFixit kit and maybe left them a little bit loose because of that. Otherwise, this guide is very good for disassembling and cleaning.
Definitely! I swear by the official iFixit kit! I didn’t think I could get to those screws at first!