Einleitung

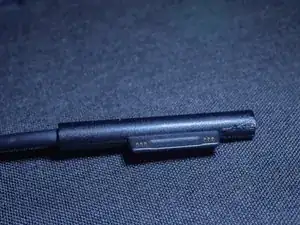
Der Stecker am Ladegerät des Microsoft Surface Pro 3/4/5/6/7 ist so konstruiert, dass es zu Kurzschlüssen kommen kann. Das Aufladen funktioniert dann nicht mehr.

Zum Glück ist die Elektronik kurzschlussfest, es reicht also, den Fehler zu beseitigen. Die Reparatur ist einfach.

  1. Cv323yaamVBDVeUX
    Cv323yaamVBDVeUX
    HQ1Jfm6DRABkCVFY
    edxMVJcNIPuXnGVL
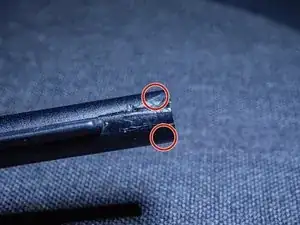
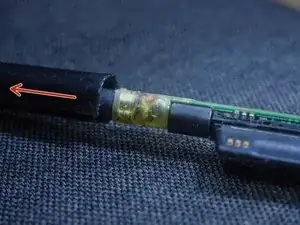
    • Setze eine Klinge in die beiden Spalte am Ende ein.

    • Das äußere Gehäuse des Steckers ist an einigen Stellen verklebt.

    • Trenne die Klebestellen mit der Klinge durch und mache mit dem nächsten Schritt weiter.

  2. XDt6pHS1WS66gFlW
    XDt6pHS1WS66gFlW
    bNuIvBLORQZSS4nU
    • Schiebe das äußere Gehäuse des Steckers zur Kabelseite hin ab.

  3. KRQ6Q6x2e4beG4rW
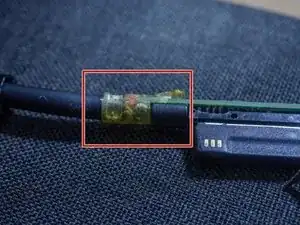
    • Entferne die Vergussmasse mit Hilfe einer Klinge und einer Pinzette, bis die Drähte frei liegen.

    • Arbeite behutsam!

  4. RGpwEc62EenVktIj
    RGpwEc62EenVktIj
    ZaVr2qLEMvO1SFBk
    6kcOQKB4BjSaQMZy
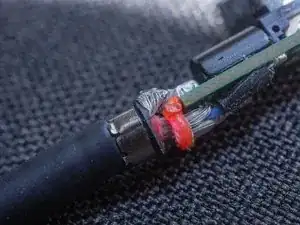
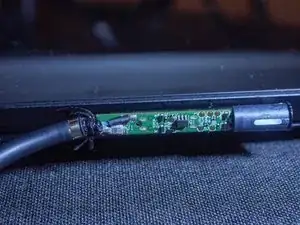
    • Microsoft hat diesen Abstandshalter eingebaut, um einen Kurzschluss des positiven und negativen Leiters zu verhindern.

    • Leider reicht dieser Abstandshalter in manchen Fällen nicht aus. Im nächsten Schritt wird gezeigt, wie er durch einen besseren ersetzt werden kann.

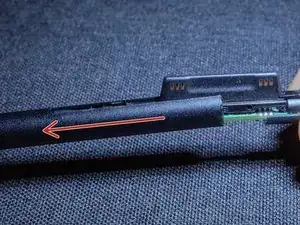
    • Entferne den roten Abstandshalter.

  5. oelnEHx33OlJNDnL
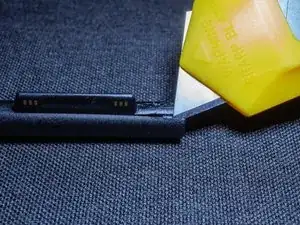
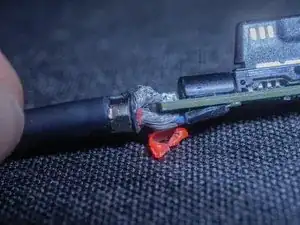
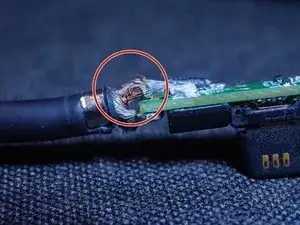
    • Hier ist der Kurzschluss zu sehen. Einige Drähtchen sind abgebrannt. Wenn es nicht zu viele sind, macht das nichts.

    • Die beiden Pole haben Kontakt zueinander. Reinige die Stelle und entferne alle Verunreinigungen.

    perfect resolution.

    i did the same and booom its working

    aman Singh -

  6. XJiiAVvKvnysb1WK
    XJiiAVvKvnysb1WK
    MpCpQ3WquBSaYanr
    yPgKT4WojZt2Nx21
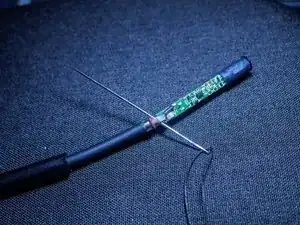
    • Nachdem sich keine Drähtchenmehr im Stecker berühren, musst du sie mit einem Baumwollfaden und einer Nähnadel gut isolieren.

    • Führe den Faden in vielen Windungen um die Drähte herum, bis sicher ist, dass sie sich niemals mehr berühren können.

  7. FccZcxsqdHXr2DfK
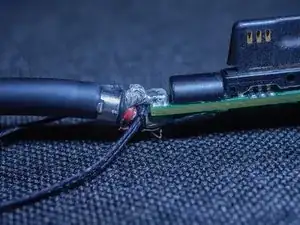
    • Probiere, ob der Adapter wieder funktioniert, bevor du den Stecker wieder zusammenbaust. Wenn er mit dem Surface Pro verbunden ist, muss die weiße LED leuchten.

Abschluss

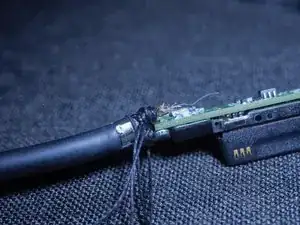
Um dein Gerät wieder zusammenbauen, folge den Schritten in umgekehrter Reihenfolge.

Valerio Nappi

Mitglied seit: 01/05/21

795 Reputation

15 Kommentare

Nice guide for fixing the Surface Pro charger that I’ve used to fix SP6 charger that was intermittently charging at first and not charging at all later.

Andres Attemann -

Was, wenn das Kabel beschädigt ist? Kann man das selbst reparieren? Danke, Oskar

oscargogl -

I don't think so, unfortunately! You can cut some sections and resolder it to the end connector, but that is an advanced repair, and only works if the damaged end is on the connector side

Valerio Nappi -

I've replaced my charger 3 times, twice with cheap off-brand replacements. These instructions let me avoid a 4th! My cheap replacement charger had even less insulation than the original. Yikes!! But now it's working great again! Thanks so much! I will check this site before replacing my stuff in the future. :D

Libby -

Thank you, thank you, thank you for this tutorial! It worked perfectly and saved me quite a few bucks for a new charger, much appreciated!!

Amber G -

Thank you! This is the only solution that works for me! All the other official solutions posted on the Microsoft site were useless.

Li Z -

Instructions working perfectly with a surface laptop 4 charger as well. Thank you very much.

Mike Pikurni -

Very good, thanks so much!!!

D B -

Thank you so much! I manage to fix the %#*@ charger and the problem was exactly what you pointed! You're guide is excellent, even if I'm really bad at sewing and I managed to use some tape, but now it works! Thank you!!!

maxxvolta -

This is brilliant! It worked. Thanks so much

Paul A Skinner -

I listened to a podcast recently where the founder of this website was interviewed and I thought, huh, I didn't know this community existed. And after two failed chargers and going no where with the Microsoft customer service to try to have my laptop repaired I thought I give this a try. I wasn't expecting anything as repairing something when it's broken has never registered in my millennial brain. BUT! This worked like a charm!! I cannot express how grateful I am for people in this community who advocate for repairs rather than replacement. I was so ready to fork out another $1000 for a new laptop and raise a complaint ( even thought about legal action against Microsoft) with ACCC on Microsoft's refusal to have this repaired even though a defect like this should have been covered under Australian Consumer Law. To be honest, I probably still should raise a complaint. It's outrageous how big companies just blatantly ignore the law and tell me that I am not entitled for repair.

Yachee Tang -

Why do you use a cotton wire to insulate? It could absorbs humidity from hair, and becoming conductor

roberto.danzo -

I did not have any problems with that, but of course you're free to use whatever you prefer. If you find that something that is readily available works better, you can update the guide to include also that option

Valerio Nappi -

What a good solution!

Using a needle and thread to insulate is very simple, although I'm a bit afraid that it will short-circuit again and spark (I don't think it will catch fire because being strongly encapsulated it won't be able to burn).

The definitive solution would be to unsolder the cable and reassemble it, leaving more of the inside insulation, but that is much more complex and risky.

It is incredible that Microsoft manufactures a power supply with such good quality (and high price), having such a weak point. Knowing that the cable causes problems, I have treated it with the utmost care from the first day, but I have not gotten rid of it stopping working.

German Bordel -

This was a life saver! I was ready buy a new adapter when I found this. Hard to believe that design flaw exists. Thanks for a great guide!

rbolling -