Einleitung

Hier wird der Austausch der Ladebuchse gezeigt.

  1. GZ2Pki1FpHlvCO3S
    GZ2Pki1FpHlvCO3S
    5VJRorbfRR23MCuC
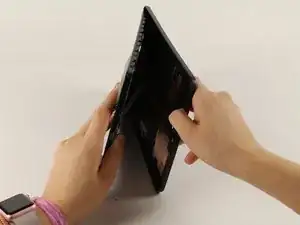
    • Lege das Gerät mit der Vorderseite zu dir.

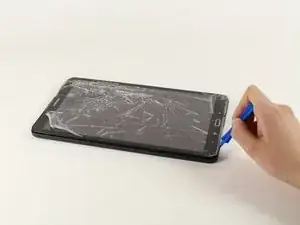
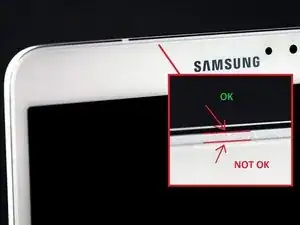
    • Fange an einer der abgerundeten Ecken an. (Vergleiche mit Bild 2).

    • Setze ein Plastiköffnungswerkzeug zwischen Vorderteil und Rückteil.

    • Wenn ein Plastiköffnungswerkzeug nicht funktionieren sollte kannst du es mit einem Metallspatel probieren, dies könnte allerdings den Kunststoff beschädigen.

    • Denke dran, dass du als erstes eine eventuell vorhandene micro-SD-Karte entfernen musst.

    AWESOME!! I was trying to open it from the “NOT OK” place and you saved me to broken the screen… thanks!!

    David Leiva -

    No problem, enjoy.

    Roger L. Ortiz -

    Felt it was easier for me to do it from the middles out.

    Tanin Garcia -

    Well then you are messing up the digitizer part, which sucks to replace on your own because it will never be stable again, ghost touches with fake digitizer with fake 3m double sided tape that doesn’t stick..

    Roger L. Ortiz -

    Important: the display is sourrounded with a plastic frame. You need to get beween this frame an the backcover (not directly at glass edge as I tried it first and almost broke the glass). Get a closeup picture of it to clarify.

    Oliver Dawid -

    wer lesen kann, ist klar im Vorteil - ich hab die SD-Karte drin gelassen. Hat aber funktioniert…

    Thomas Wolter -

    Don’t use a very small flathead screwdriver as a spudger. Just shattered the screen :(

    nikvoss -

    Yes, shattered the screen. To the garbage, it goes. A little knowledge is a dangerous thing. This a repair better suited for a professional repair! Thanks for helping me make the decision to get another one!

    vancega -

  2. FEt6AIIjfR5mPXQH
    FEt6AIIjfR5mPXQH
    SOQODCRyQZlwVvj1
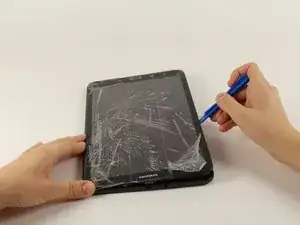
    • Wenn du das Werkzeug einsetzen konntest, dann schiebe es rings um das Gerät, um die Teile zu trennen.

    • Hebe den Rückdeckel vom Gerät weg.

    • Beim Öffnen wirst du klickende Geräusche hören.

  3. fPglWd16CqrfTnPk
    fPglWd16CqrfTnPk
    Ixaqq2Rd5qpRFqsy
    xE4TWX2YDWswXU6Z
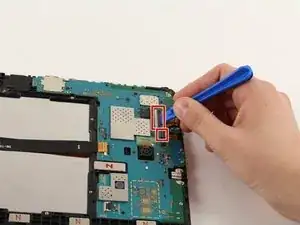
    • Klappe die Sicherungsbügel an den beiden ZIF Verbindern auf der Hauptplatine mit einem Plastiköffnungswerkzeug hoch.

    • Schiebe die beiden orangenen Flachbandkabel aus den Verbindern heraus.

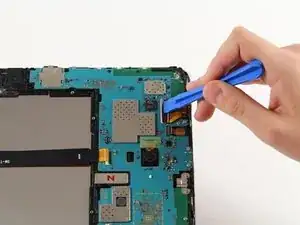
    • Entferne die Frontkamera.

    This step omits the disconnection of the battery from the motherboard , which is shown disconnected in this picture but was connected in the previous step

    Christopher Ford -

    Thanks for bringing this to our attention. We added the relevant battery disconnection steps—hope this helps!

    Kristen Gismondi -

    If the model you are working on is the T585 you will need to carefully pry up the blue antennae cable and disconnect the sim card slot from the motherboard.

    Brendon Gould -

  4. ZeXlPco1GFY2fcas
    • Trenne die Kopfhörerbuchse von der Hauptplatine ab.

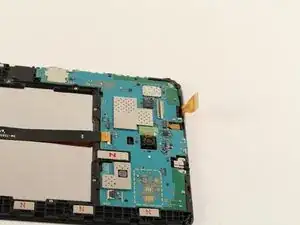
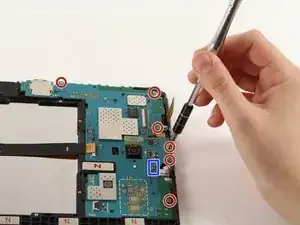
    • Entferne sechs 4 mm Kreuzschlitzschrauben #000.

    die ganze Platine musste ich gar nicht ausbauen. Ich konnte die Kopfhörerbuchse vorsichtig mit einem kleinen flachen Schrubendreher lösen.

    Thomas Wolter -

  5. sR1EQqLISYUKoWBI
    sR1EQqLISYUKoWBI
    ZWuKRRPlJL6FGDYS
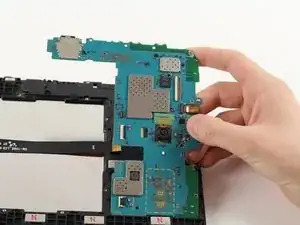
    • Setze das Plastiköffnungswerkzeug unter die Hauptplatine und hebe sie aus dem Tablet.

    • Achte darauf, dass sich keine Stecker verfangen.

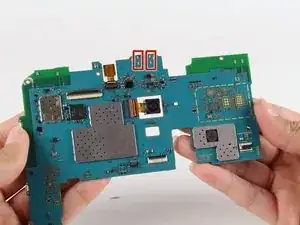
    • Entferne die Metallhalterung unter der Ladebuchse und lege sie zur Seite.

    Replacing the broken screen, I stupidly unhooked the LCD with a metal screwdriver. It makes the sound of coming on but no picture. Is that the motherboard?

    MARGARET -

    I replaced screen once before and had no problem except using a screwdriver this time.

    MARGARET -

    I have tab a charging and show on screen but not starting at all motherboard water damage I clean all there any way make it start by motherboard with out power button

    waleed nawzad -

  6. C2I1OYnhIZjMNQrG
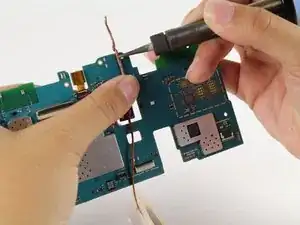
    • Lege Entlötlitze auf eine der vier Lötstellen am oberen Ende der Hauptplatine.

    • Setze den Lötkolben auf die Entlötlitze und entlöte so die Lötstelle. Wenn du unsicher bist hilft dir diese Anleitung .

    • Wenn die Litze nicht mehr saugen sollte, dann nimm ein neues Stück der Litze.

    • Sei vorsichtig mit dem Lötkolben, du kannst dich verbrennen oder die Platine beschädigen.

    Please be sure not to hold the soldering iron by the hot end as shown in the picture

    Michael Wilkosz -

  7. ePb64x1sc1bHDgPZ
    • Wiederhole für die anderen drei Lötstellen.

    • Hebe das kleine graue Metallstück aus dem Gerät.

Abschluss

Um dein Gerät wieder zusammen zu setzen musst du ein neues Metallstück dort einsetzen, wo das alte war, und an der Hauptplatine in den vier Löchern auf der Rückseite der Hauptplatine festlöten.

Isabella Li

Mitglied seit: 02/10/17

2304 Reputation

12 Kommentare

It is impossible to unmount the old damaged USB-Interface this way. Beside the four solder-points ist is also soldered to 5 extremely small points on the motherboards opposite side. These are SMD-mounted contacts and in my case trying to unsolder them damaged the motherbords layout.

Lutz Christoph -

I was able to desolder it with a hot air rework station + soldering iron without damaging the pcb then using a wick cut at an angle + the heat gun to clean the mounting holes you must clean then fully so the new part will mount flush.

Also take care with resoldering the new connector not to bridge the pins on the usb port.

cusbrar2 -

what is the model of USB connector here? I would like to buy in advance before opening

Алексей Хейдоров -

These instructions are really incomplete. In addition to the 4 through-hole points mentioned, there are also 2 large ground pads under the connector, and 7 tiny surface-mount pins on the back. Removing this port pretty much requires low-temp (chip-quick) solder or a hot-air rework station. Soldering it back on with only an iron proved quite difficult - hot-air rework station highly recommended. This took me about an hour, and I’ve been soldering (hobby mostly) for the better part of 30 years.

Also, there’s no reason to remove the battery to change the charging port. The motherboard can be removed without removing the battery. And really, the cameras should be disconnected too, rather than leaving them dangling by their ribbon cables.

Nathan Lewis -

Where can you buy the exact replacement USB port

yafecker -

Please tell us what region you’re in and someone might be able to help with a relevant suggestion.

Philip Le Riche -

Sucessfully completed. More Flex cables to disconnect, but thats straightforward. Replacement part from ebay. Unsolder and soldering are complicated even with professionell hot air station, microscope etc. But now it works

fox_alpha_fox -

Just a quick question. Does the USB port have to be fully removed? If the unit is not charging isn’t it more likely that one of the solder connections is simply broken?

Cheers,

A

andrewscline -

What type of solder should be used to re-affix the new charging port?

Jim Barber -

Lead-free solder paste. Small amounts are sold in syringes, eBay is a good source

Chris Halliwell -

The circuit board will need some heat prior to using a hot-air solder station. You will need to remove both cameras before subjecting to a pre-heat. Pre-heat to between 150 and 200c then apply enough heat to reflow the solder joints. A pair of tweezers will help remove the old USB socket. Once removed desolder the throu-holes and clean the surface mount pads. Apply small amounts of solder paste on the solder pads and fill the trou-holes, before placing the new USB socket . The PCB will need pre-heating again before finally using the hot-air solder gun to flow the solder joints. Check SMD pads and throu-holes have all flowed properly.

Chris Halliwell -

Chris Halliwell knows what they are doing. If you don't have a hot air station, decent soldering station and surface mount soldering experience plus the sundries ie solder paste, good tweezers, good lighting, magnify glass as a minimum then don't even try.

Surface Mount soldering around temperature sensitive components is a risky game unless you are aware of the processes involved. Even then it only takes a few extra degrees in temperature to melt and fry surrounding part's.

rj young -