Einleitung
Falls der Bildschirm nicht mehr reagiert, beschreibt diese Anleitung das Ersetzen des Bildschirms. Sollte der Digitiser intakt sein, und man möchte ihn weiter verwenden, wird zum Entfernen viel Vorsicht und viel Geduld benötigt.
Werkzeuge
Ersatzteile
-
-
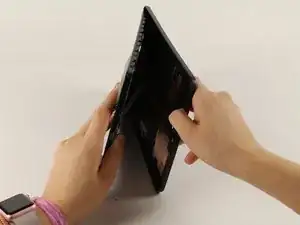
Lege das Gerät mit der Vorderseite zu dir.
-
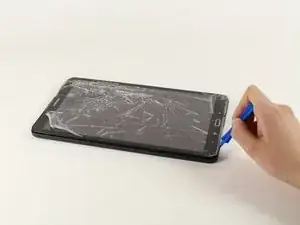
Fange an einer der abgerundeten Ecken an. (Vergleiche mit Bild 2).
-
Setze ein Plastiköffnungswerkzeug zwischen Vorderteil und Rückteil.
-
-
-
Wenn du das Werkzeug einsetzen konntest, dann schiebe es rings um das Gerät, um die Teile zu trennen.
-
Hebe den Rückdeckel vom Gerät weg.
-
-
-
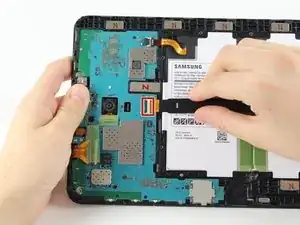
Entferne den Klebestreifen und klappe den Sicherungsbügel am ZIF Verbinder des Akkus hoch.
-
Schiebe das orangene Flachbandkabel zum Akku aus dem ZIF-Verbinder heraus.
-
-
-
Entferne den Klebestreifen, hebe den Sicherungsbügel hoch und ziehe das weiße Flachbandkabel zum Lautsprecher heraus.
-
-
-
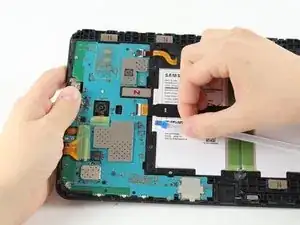
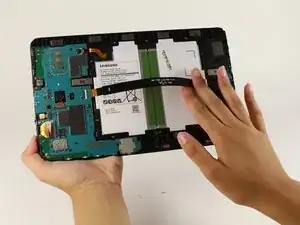
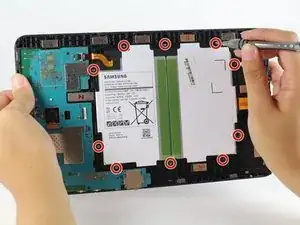
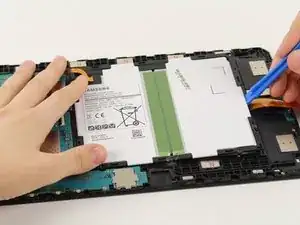
Der Akku ist mit zehn 4 mm Kreuzschlitzschrauben #000 gesichert. Drehe sie heraus.
-
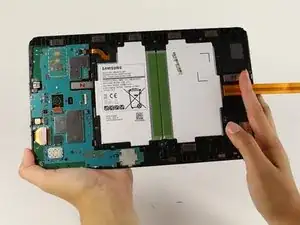
Schiebe ein Plastiköffnungswerkzeug unter den Akku in der Nähe der Lautsprecher und hebe ihn hoch.
-
-
-
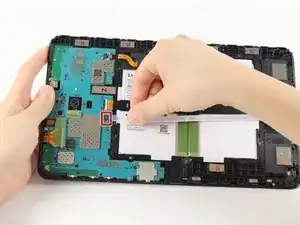
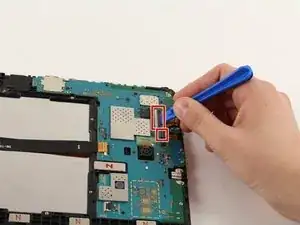
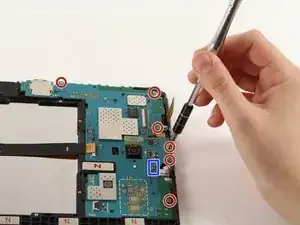
Klappe die Sicherungsbügel an den beiden ZIF Verbindern auf der Hauptplatine mit einem Plastiköffnungswerkzeug hoch.
-
Schiebe die beiden orangenen Flachbandkabel aus den Verbindern heraus.
-
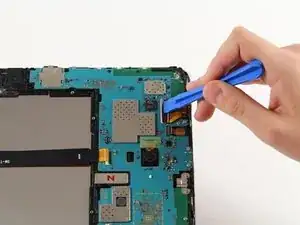
Entferne die Frontkamera.
-
-
-
Trenne die Kopfhörerbuchse von der Hauptplatine ab.
-
Entferne sechs 4 mm Kreuzschlitzschrauben #000.
-
-
-
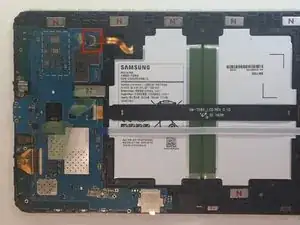
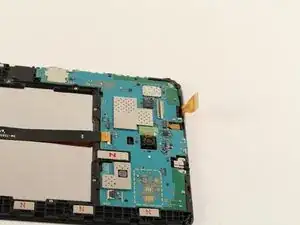
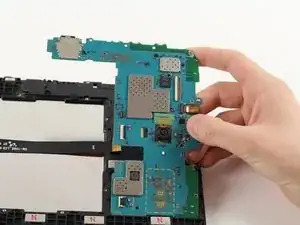
Setze das Plastiköffnungswerkzeug unter die Hauptplatine und hebe sie aus dem Tablet.
-
Entferne die Metallhalterung unter der Ladebuchse und lege sie zur Seite.
-
-
-
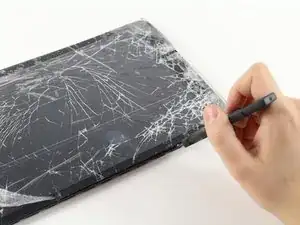
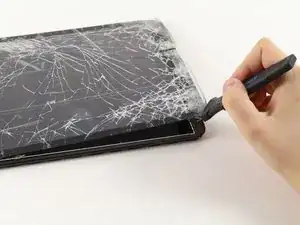
Beginne seitlich unten am Tablet, erwärme es und setze einen Jimmy oder ein Plektrum zwischen Touchscreen und Rahmen ein.
-
Trenne zuerst den Kleber am unteren Rand des Tablets auf, dann die beiden seitlichen Ränder. Das Touchscreenkabel befindet sich oben und wird durch einen Schlitz im Mittelrahmen geführt. Es kann leicht abgerissen oder beschädigt werden, wenn das Glas entfernt wird.
-
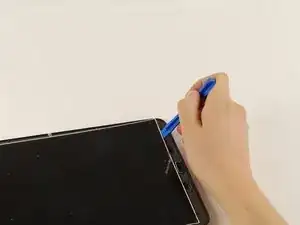
Sollte das Glas intakt sein, und es soll wiederverwendet werden, sollte man vorsichtig sein und das Werkzeug nicht tiefer als die Breite des schwarzen Rands einzuführen. Ansonsten riskiert man Schäden am Digitiser, einem dünnen Plastik-Film der auf der Rückseite des Glases klebt.
-
Der Kleber bleibt eher am Plastik des Mittelrahmens kleben statt am Glas, aber löst sich besser und sauberer vom Mittelrahmen, wenn man ihn an einem Punkt abhebt. Das reduziert auch das Risiko den Digitiser Film zu beschädigen.
-
-
-
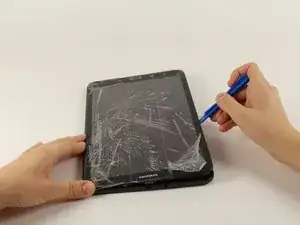
Drehe das Tablet um und setze ein Plastiköffnungswerkzeug unter den Bildschirm ein, um ihn damit aus dem Gerät herauszuheben.
-
Das LCD Panel ist mit doppelseitigem Klebeband am Mittelrahmen befestigt. Das Klebeband vorsichtig anheben, und dem Kleber Zeit geben sich zu lösen.
-

Um dein Gerät wieder zusammenzusetzen, folge den Schritten in umgekehrter Reihenfolge.
20 Kommentare
Will be trying this in the next couple of days, see there was no heat gun used to take the front glass off, I’m only replacing the LCD so does the touch glass need warming to remove or does it just jimmy off?
tcatt -
I would Personally HIGHLY RECOMMEND Heat.
this Guide Perturbs me slightly.It never detaches the battery from motherboard and misses a couple of the Connectors it feels like its skipping steps.
After replacing the digitizer, my soft keys do not function. The home button works just fine, but i cannot press the back button or the recent application button. Would this be due to a faulty digitizer? Or could it possibly be a faulty ‘ daughter board “? ( not positive if the home button working excludes this theory )
Same problem here. Did u fix a fix?
Same here HAS ANYONE SOLVED THIS ISSUE
Hi, could you help me with how to change a LCD cable for same device. Many thanks
Timur H -
AWESOME!! I was trying to open it from the “NOT OK” place and you saved me to broken the screen… thanks!!
David Leiva -
No problem, enjoy.
Roger L. Ortiz -
Felt it was easier for me to do it from the middles out.
Tanin Garcia -
Well then you are messing up the digitizer part, which sucks to replace on your own because it will never be stable again, ghost touches with fake digitizer with fake 3m double sided tape that doesn’t stick..
Roger L. Ortiz -
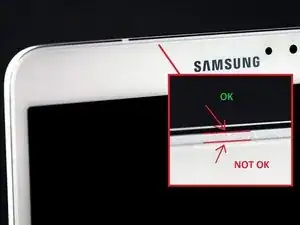
Important: the display is sourrounded with a plastic frame. You need to get beween this frame an the backcover (not directly at glass edge as I tried it first and almost broke the glass). Get a closeup picture of it to clarify.
Oliver Dawid -
wer lesen kann, ist klar im Vorteil - ich hab die SD-Karte drin gelassen. Hat aber funktioniert…
Thomas Wolter -
Don’t use a very small flathead screwdriver as a spudger. Just shattered the screen :(
nikvoss -
Yes, shattered the screen. To the garbage, it goes. A little knowledge is a dangerous thing. This a repair better suited for a professional repair! Thanks for helping me make the decision to get another one!
vancega -