Einleitung

Diese Anleitung zeigt dir, wie du den Auslöser deines Dyson V11 Torque Drive Staubsaugers ersetzen kannst. Da der Auslöser aus Kunststoff besteht, kann er leicht brechen. Wenn der Auslöser deines Dyson V11 Torque Drive gebrochen ist, wird er nicht anfangen zu saugen. Auch wenn der Akku voll aufgeladen ist, kann der Dyson V11 Torque Drive nicht mehr starten. Nach dem Austausch des Auslösers sollte der Dyson V11 Torque Drive Staubsauger wieder betriebsbereit sein und mit dem Saugen beginnen.

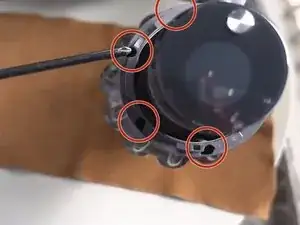
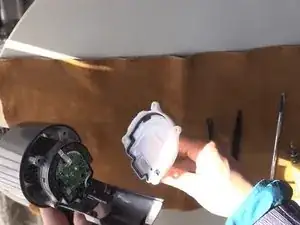
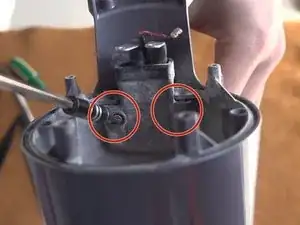
Für den Austausch des Auslösers am Dyson V11 Torque Drive Staubsauger benötigst du einen Kreuzschlitzschraubendreher #1, einen Kreuzschlitzschraubendreher #0 und einen Spudger.

  1. GjFY5tOxoEhJfYwb
    • Entferne die vier Kreuzschlitzschrauben #1 neben der Akkuanzeige.

    YOU MUST REMOVE THE BATTERY FIRST!! It is not apparent in this guide, but I almost got electrocuted when I went to remove the power in step 6!

    Ran Xiao -

    done the same once, but yeah always remove the power source before working on any appliance

    Ray Bradshaw (Falconsirrus) -

  2. qOT6w4tUI2WGhuKy
    • Entferne die beiden Kreuzschlitzschrauben #1 neben dem Handgriff.

  3. WHZi2pCJvJm5nDuo
    • Löse den Handgriff und das Vorderteil vom Staubsauger ab.

  4. DafmKoDds5lXIsvC
    • Entferne die beiden Kreuzschlitzschrauben #0 von der Schutzabdeckung der Platine.

    These screws were Torx #7 instead on my Dyson V11

    Lenno -

    Same for me.

    Beth Romanelli -

    its a T8 on all of the Dysons V10 and V11 at this stage

    Ray Bradshaw (Falconsirrus) -

  5. UctQyjDigS4DwF5V
    • Nimm die Schutzabdeckung ab.

    You need to pop the connector through the white cover to enable its removal.

    Chuck -

    unnecessary in my experience, just move out the way, unclip the tiny wire and remove the 2 power lines

    Ray Bradshaw (Falconsirrus) -

  6. dsrtsI4ehtFSQvGM
    • Entferne die einzelne Kreuzschlitzschraube #1 von der Platine.

    These screws were Torx #7 instead on my Dyson V11 and bth need to be removed and the pins plied back.

    Lenno -

    There are two screws (torx) here connecting both terminals to the motherboard. Also the pins need to be bent back to slow them to pull through. There was also a black wire that had to be disconnected.

    Chuck -

    your spot on there. like most metals bending more than necessary will snap them so be careful.

    Ray Bradshaw (Falconsirrus) -

  7. yDa552GTij2diQRU
    • Entferne das Mittelteil des äußeren Gehäuses.

  8. qGlZBjLMHsNtECQQ
    • Entferne die einzelne Kreuzschlitzschraube #0 im Inneren des Ladeteils.

    This screw was Torx #7 instead on my Dyson V11

    Lenno -

    What if the housing on that screw is broken? Is it necessary for that screw to be in place?

    BK Estis -

    No, the point of this screw is to fix the trigger assy inside the handle, technically when you refit the battery and screw in, it will all hold in place

    Ray Bradshaw (Falconsirrus) -

  9. 3pSvuZNberXpZuvj
    • Entferne die beiden Kreuzschlitzschrauben #0.

    These screws were Torx #7 instead on my Dyson V11 and you need a very short screwdriver/ratchet or a flexible bit attachment.

    Lenno -

    T8 - i use a 100mm long shaft, it is at a bit of an angle but works fine

    Ray Bradshaw (Falconsirrus) -

  10. DCVOUUxZ4JPvFIUS
    DCVOUUxZ4JPvFIUS
    no1SLBFrge4cJEMD
    • Drücke auf die im Bild markierte Stelle, um den Auslöser aus dem Ladeteil zu entfernen.

    pushing the trigger assy down tho the handle, well large screwdriver and small hammer works well, lol

    Ray Bradshaw (Falconsirrus) -

Abschluss

Um dein Gerät wieder zusammenzubauen, folge den Schritten dieser Anleitung in umgekehrter Reihenfolge.

Beicheng Zhu

Mitglied seit: 15/01/22

285 Reputation

3 Kommentare

Some of the screws in this repair (step 8 and 9) require a T8 Torx bit instead of a Phillips. The Torx screwdriver should be at least 10 cm long and relatively thin to be able to fit into the base of the vacuum. The screwdriver I used from my iFixit essentials kit was too short and too wide to fit into the compartment. That should be added to the guide.

James Leung -

L'assemblage de cet appareil le rend assez compliqué à démonter... surtout la partie avec les câbles de puissance qui vont à la batterie.

Par expérience, en ce qui concerne la gâchette c'est faisable. La gâchette peut se trouver facilement sur internet, ça permet de réparer à pas cher et souvent certaines pièces génériques sont renforcées.

Brendan -

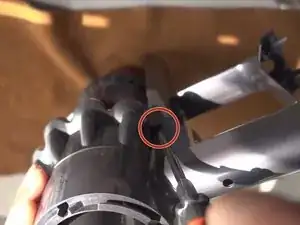
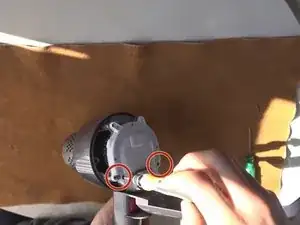
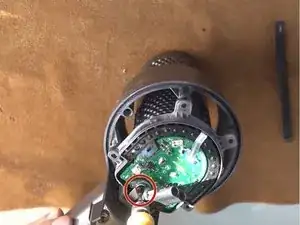
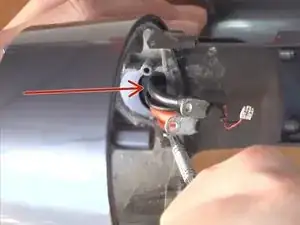
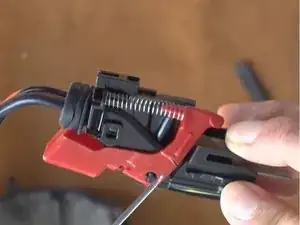
Also applicable to the v10. Some philips are T8 and as one comment already said, they need to be long and thin for some screws - but otherwise a good guide. Step 1 should be remove battery. My dust cover over the circuit board had little retaining clips which made it feel stuck. The small connector attaching the red/white wires lifts out vertically, with a little retaining clip. The final step, I needed a large screw driver to push the trigger part out. I couldn't get the leverage with the shorter spudger.

Ben Mason -